LeShellem
A new beginning

Member since 2/07 3600 total posts
Name:
LeShelle
|
Re: I made bread from scratch
I used a caserole pan with lid. It was oven safe to 500 degrees.
In a large glass or ceramic mixing bowl, (NOT metal) combine:
3 cups all purpose flour or bread flour
1 1/2 - 2 1/2 teaspoons salt (depends on your taste)
1/4 teaspoon instant dry yeast
Mix well to combine dry ingredients
Add:
1 1/2 cups water
Mix well with a spoon. No need to beat this , just get all the flour absorbed - you might need a little extra water if it's very dry where you are. Make sure you purchase instant yeast such as Rapid Rise from Fleischmann's or Quick Rise from Red Star. You only need 1/4 teaspoon, not the whole package. Fold the foil package that the yeast came in and place it in a zipper bag in the refrigerator for the next loaf.
Cover your dough (it will not be very pretty) with plastic wrap and place in a warm place (at least 70 degrees). I find the microwave oven (off, of course) makes an excellent resting place. I usually make this in the evening so I can bake bread the next evening. In some ways, this is easier than conventional bread baking where everything happens in compressed time - you end up baking until 11 at night. With this method, this first step takes just five minutes.
If your dough has not risen significantly, it could be that your yeast was old and no longer active...you may want to give it some more time to allow naturally occuring yeasts to multiply. In the middle ages, there was no yeast for sale so folks relied on natural wild yeasts that are always flying around in the air. For consistency, using yeast you buy is a better idea.
This part can be a little sticky and tricky, so be patient. Your dough should be well risen after the 19-24 hour rest period. Sprinkle some flour over the top and start scooping the dough together - use more flour if you need to. Place the dough on a well-floured piece of parchment paper. It MUST be WELL floured, or the dough will stick. Now, simply fold the dough from the sides, and then the top and bottom, like you were folding all four sides to the center, and flip it over. Roll up the top of the parchment paper so the dough has a little covering, like a tent. Parchment paper should be available in any grocery store - you can also use waxed paper.
Now, let the dough rest in the paper from 1-2 hours, or until about doubled in size. I usually do this out on the counter.
Perhaps the second most crucial part of this recipe (after the long rise period) is the selection of a baking dish. You need to essentially create "an oven within an oven" which will produce the steam you need to achieve the wonderful crust. In the original recipe, a Le Creuset dutch oven was recommended, in the 4 to 5 quart size.
I bought new Pyrex and it seems to work quite well. Many though have warned that Pyrex could be dangerous and possibly shatter, so use at your own risk! I bought a 5 quart bowl and use a Pyrex pie plate as a lid - a $10.00 solution. As Pyrex ages, it becomes more likely to shatter due to the continuous heating and cooling, so if you go the Pyrex route, buy new. Some have also used their Cephalon dutch ovens, but have reported sticking and cleaning problems. Also, do not be tempted with a knock-off Le Creuset...I saw one in a big box store for $39.00, but the knob at the top would not have taken the high temperature needed for this bread.
About 1/2 hour before baking, place your baking dish as selected above in a cold oven to pre-heat. You should not need to grease the pan, but you can if you choose to. I have found it unecessary with the Pyrex. Set the oven to 475 degrees - a very hot oven, so be careful! When the oven has reached that temperature, open the oven door and pull out the rack (wearing oven mitts) with your preheated pan. Take the dough in the parchment paper and "plop" it into the pan - PLEASE BE VERY CAREFUL AS THE OVEN AND THE PAN ARE VERY HOT!!! It does not need to be all nice and perfect - this is a rustic loaf. Carefully place the lid on the pot and slide slowly back into the oven. Close the oven door and set the timer for 30 minutes.
DO NOT OPEN THE OVEN DOOR TO PEEK! If you oven has a window and light, you can watch the bread do its final rise or "oven spring" (if you are using Pyrex). Otherwise, you will have to curb your curiosity. Don't worry if a lot of the flour from the parchment ended up on the bread - it will actually add to the look of the bread when it's finished. Also, remember that when the yeast was "brewing," it was producing alcohol - the very small amount produced will burn off during the baking process. The yeast used in baking is actually the same type used in brewing beer, latin name Saccharomyces cerevisia.
After 30 minutes, open the oven and CAREFULLY remove the pot lid, wearing your oven mitts. Set the lid in a safe place, away from any children or pets, to cool. Close the oven door and set your timer for 20 minutes - oven temperature stays the same at 475 degrees. After 20 minutes, check the loaf to see if it has sufficiently browned. If not, let it bake an additional 5-7 minutes.
Now, the moment! Carefully remove the baking bowl from the oven, wearing your oven mitts. Flip the bread out of the baking dish and carefully place the bread on a cooling rack. Turn off the oven and return the baking dish to the oven to gradually cool down.
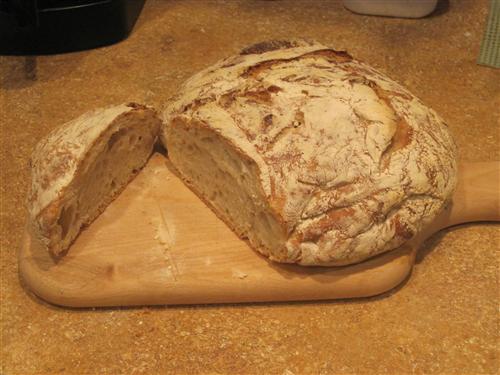
If all went right, you should have a beautiful rustic loaf that will SING to you - as the bread cools, you will hear crackling noises which indicate your crust is perfect! See what a nice finish the dusting flour gives?
RESIST the temptation to cut open your cooling bread. It must sit at least one hour before slicing.
The fruits of your labor are evident! After a few successes with this basic recipe, allow your imagination to take over - use different types of flour such whole wheat, rye or spelt; add things such as chopped olives or dried tomatoes. I cut my loaves with an electric knife, but any good bread knife will also do the trick.
Storage: Keep this bread out of the refrigerator! It will ruin the crust. Keep it cut side down covered with a piece of paper or a towel. That keeps the moisture in but does not ruin the crust. Keeping in a zipper bag will also cause the crust to become less crunchy.
Recipe
Message edited 4/26/2010 5:17:38 PM.
|